CAPITOLO 9
I Nostri GameObjects Specializzati
In questo capitolo vedremo come estendere la classe Phaser.GameObject.Sprite per creare le nostre classi specializzate, alle quali assegneremo dei comportamenti peculiari.
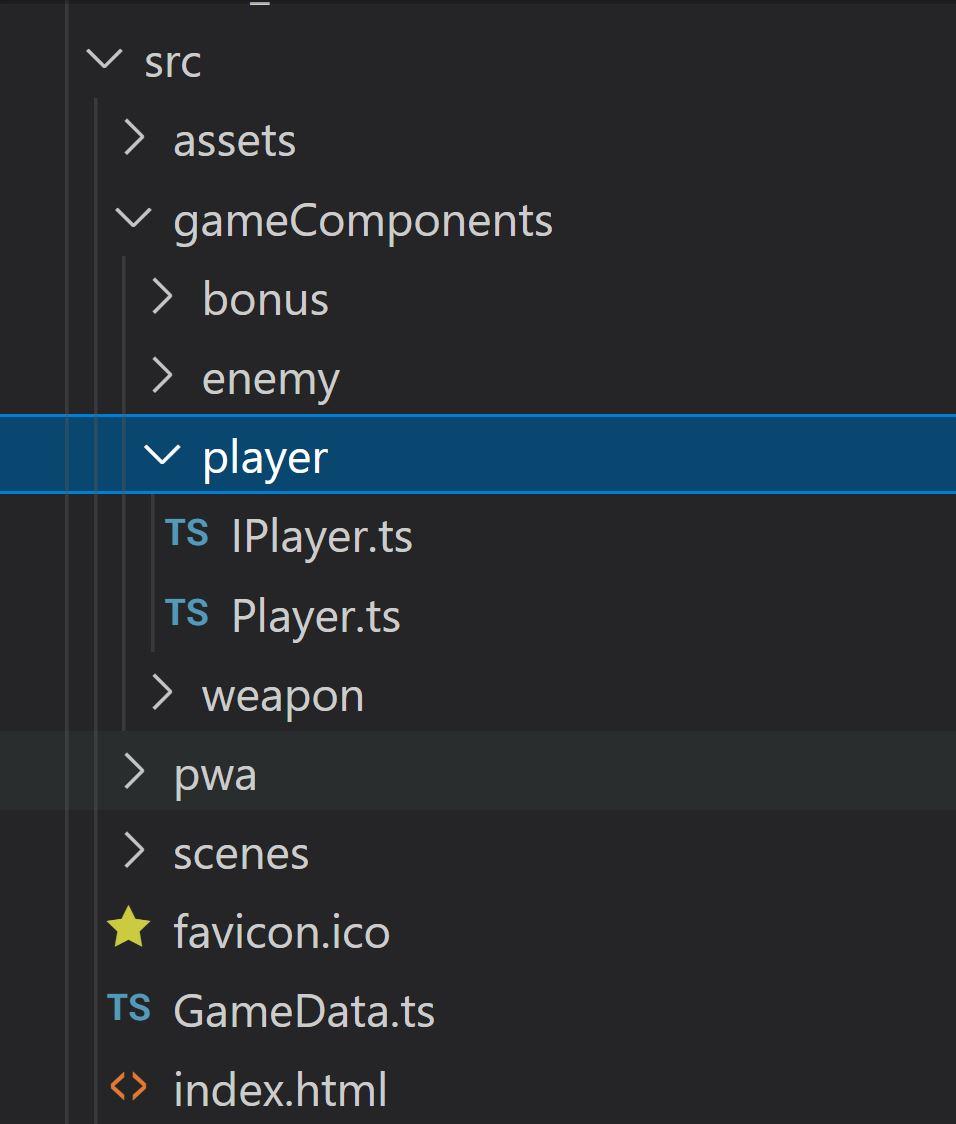
Nella cartella src del nostro progetto template creeremo una folder che chiameremo gameComponents. Questo nome è arbitrario, la potremmo chiamare anche customGameObjects oppure customClasses o come più ci piace. Questa cartella sarà il contenitore delle nostre classi custom. All'interno di questa cartella creeremo tante folder quanti sono le classi custom che useremo nel nostro gioco.
Creiamo il nostro Player
Come vedete nell'immagine ho creato una sottocartella player nella quale ho creato due file: IPlayer.ts e Player.ts. Per l'implementazione del player ho utilizzato il seguente spritesheet.
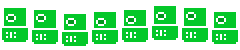
Inseriamo lo snippet per il caricamento dello spritesheet in GameData:
{ name: "robo", path: "assets/images/robo.png", width: 30, height: 50, frames: 8 }
IPlayer.ts
Come indicato nel capitolo 2, le interfacce sono un modo per definire un contratto che specifica quali proprietà e metodi devono avere un oggetto o una classe.
interface IPlayer {
    create(): void;
    update(time: number, delta: number): void;
}

export default IPlayer;
In questa interfaccia molto semplice definiamo che i metodi obbligatori per la classe che implementerà la nostra interfaccia sono il metodo create() e update().
Questi due metodi non funzionano come i metodi create() e update() delle scene, ovvero non vengono richiamati in automatico quando la classe viene creata.
L'istruzione export default viene utilizzata quando si creano moduli JavaScript per esportare oggetti, funzioni e variabili dal modulo, in modo che possano essere utilizzati da altri programmi con l'aiuto dell'istruzione import. Come vedremo più avanti, l'interfaccia IPlayer verrà importata dalla classe Player.
Player.ts
Quella che vedete qui sotto è l'implementazione di base di una classe Player che estende la classe Phaser.GameObjects.Sprite e implementa l'interfaccia IPlayer.
Potreste utilizzare questo codice come base per l'implementazione di una qualunque altra classe che estende la classe Sprite, semplicemente cambiando il nome della classe da Player a Enemy e l'interfaccia da IPlayer a IEnemy.
import IPlayer from "./IPlayer";

export default class Player extends Phaser.GameObjects.Sprite implements IPlayer {
    // il tipo genericConfig è definito nella cartella typings/custom.ts
    // è un'interfaccia che definisce i parametri da passare alla classe
    // quando creiamo una nuova istanza
    private _config: genericConfig;

    constructor(params: genericConfig) {
        super(params.scene, params.x, params.y, params.key);
        this._config = params;
        this.create();
    }

    create() {}

    update(time: number, delta: number) {}
}
Andiamo ad aggiungere un po' di codice all'implementazione base:
import IPlayer from "./IPlayer";
// Importiamo la scena di gameplay in modo da potervi accedere
import GamePlay from "../../scenes/GamePlay";

export default class Player extends Phaser.GameObjects.Sprite implements IPlayer {
    private _config: genericConfig;
    // riferimento alla scena dove il nostro game object verrà inserito
    private _scene: GamePlay;
    // variabile locale di tipo arcade.body per poter accedere ai metodi del Body
    private _body: Phaser.Physics.Arcade.Body;
    // variabile locale per la gestione dei tasti cursore
    private _cursors: Phaser.Types.Input.Keyboard.CursorKeys;
    // variabile locale per impostare la velocità del body
    private _velocity: number = 200;
    // array di oggetti per la creazione dell'animazione
    private _animations: Array<{
        key: string;
        frames: Array<number>;
        frameRate: number;
        yoyo: boolean;
        repeat: number;
    }> = [
        { key: "idle", frames: [0, 1, 2, 3], frameRate: 10, yoyo: false, repeat: -1 },
        { key: "move", frames: [4, 5, 6, 7], frameRate: 10, yoyo: false, repeat: -1 },
    ];

    constructor(params: genericConfig) {
        super(params.scene, params.x, params.y, params.key);
        this._config = params;
        // richiamiamo il metodo create nel quale sono inserite alcune
        // inizializzazioni della nostra classe custom
        this.create();
        // richiamiamo un metodo locale per implementare le animazioni dello sprite
        this.createAnimations();
    }

    create() {
        // Creiamo un riferimento alla scena
        this._scene = <GamePlay>this._config.scene;
        // Abilitiamo this alla fisica di phaser
        this._scene.physics.world.enable(this);
        // Inseriamo in this._body il cast di this.body
        this._body = <Phaser.Physics.Arcade.Body>this.body;
        // indichiamo al body che deve collidere con i bounds del world
        this._body.setCollideWorldBounds(true);
        // Creiamo l'istanza dei cursori per poter muovere il Player
        this._cursors = this._scene.input.keyboard.createCursorKeys();
        // Settiamo il livello di profondità a 11
        this.setDepth(11);
        // Aggiungiamo il Player alla scena
        this._scene.add.existing(this);
    }

    createAnimations() {
        this._animations.forEach((element) => {
            if (!this._scene.anims.exists(element.key)) {
                let _animation: Phaser.Types.Animations.Animation = {
                    key: element.key,
                    frames: this.anims.generateFrameNumbers("robo", {
                        frames: element.frames,
                    }),
                    frameRate: element.frameRate,
                    yoyo: element.yoyo,
                    repeat: element.repeat,
                };
                this._scene.anims.create(_animation);
            }
        });
    }

    update(time: number, delta: number) {
        this.setDepth(this.y);

        // se il cursore sinistro è premuto
        if (this._cursors.left.isDown) {
            this.setFlipX(false);
            this.anims.play("move", true);
            this._body.setVelocityX(-this._velocity);
        }
        // se il cursore destro è premuto
        if (this._cursors.right.isDown) {
            this.setFlipX(true);
            this.anims.play("move", true);
            this._body.setVelocityX(this._velocity);
        }
        // se il cursore in alto è premuto
        if (this._cursors.up.isDown) {
            this.anims.play("move", true);
            this._body.setVelocityY(-this._velocity);
        }
        // se il cursore in basso è premuto
        if (this._cursors.down.isDown) {
            this.anims.play("move", true);
            this._body.setVelocityY(this._velocity);
        }

        if (
            !this._cursors.left.isDown &&
            !this._cursors.right.isDown &&
            !this._cursors.up.isDown &&
            !this._cursors.down.isDown
        ) {
            this._body.setVelocity(0);
            this.anims.play("idle", true);
        }
    }
}
Inseriamo il Player nella scena di GamePlay
Nel codice sottostante c'è l'implementazione di una scena di GamePlay di base nella quale inseriremo la nostra istanza di Player.
// importiamo la classe Player nella scena
import Player from "../gameComponents/player/Player";

export default class GamePlay extends Phaser.Scene {
    // variabile locale che associeremo alla main camera
    private _mainCamera: Phaser.Cameras.Scene2D.Camera;
    // variabile locale che conterrà l'istanza del Player
    private _player: Player;

    constructor() {
        super({ key: "GamePlay" });
    }

    create() {
        this._mainCamera = this.cameras.main;
        this._mainCamera.setBackgroundColor(0x000000);

        // aggiungiamo un'immagine qualunque alla scena
        // per percepire il movimento del Player e della camera
        this.add.image(0, 0, "bg6").setOrigin(0);

        // settiamo i bounds della camera e del world
        this._mainCamera.setBounds(
            0,                          // x
            0,                          // y
            this.game.canvas.width * 2, // larghezza
            this.game.canvas.height * 2 // altezza
        );
        this.physics.world.setBounds(
            0,
            0,
            this.game.canvas.width * 2,
            this.game.canvas.height * 2
        );

        // Creiamo l'istanza del Player
        this._player = new Player({ scene: this, x: 512, y: 300, key: "robo" });

        // Richiamiamo il metodo che attiva il follow della camera sul Player
        this.followPlayer();
    }

    followPlayer() {
        this._mainCamera.startFollow(this._player, true, 0.1, 0.1);
    }

    update(time: number, delta: number): void {
        // richiamiamo il metodo update del player
        this._player.update(time, delta);
    }
}
Richiamiamo un metodo della scena dal nostro Player
Dalla nostra classe custom è possibile richiamare dei metodi custom della scena GamePlay. Vediamo un esempio semplice: nel metodo update del Player inseriamo una chiamata ad un metodo custom della scena. Questo metodo riceverà i valori di x e y del Player e li stamperà in un gameObject di tipo text.
Nel metodo update del Player aggiungiamo:
this._scene.updateValues(this.x, this.y);
Nella scena inseriamo prima del costruttore una variabile privata che ospiterà il nostro text:
private _text: Phaser.GameObjects.Text;
Nella create subito dopo l'immagine di background creiamo la nostra istanza di text, settando il valore di scrollFactor a 0. In questo modo il testo non si muoverà con il movimento della camera:
this._text = this.add.text(0, 0, "").setScrollFactor(0);
Inseriamo il nostro metodo custom updateValues() dopo il metodo create:
updateValues(x: number, y: number) {
    this._text.setText("player position: " + Math.round(x) + " " + Math.round(y));
}
Il metodo Math.round è proprio di JavaScript e serve a visualizzare l'intero più vicino di un numero con la virgola.
Creiamo una classe custom per un bonus
Questa volta, a differenza di quanto fatto per il player, creeremo tre file nella sottocartella Bonus: IBonus.ts, Bonus.ts e BonusCoin.ts. Per l'implementazione del bonus ho utilizzato il seguente spritesheet.

Inseriamo lo snippet per il caricamento dello spritesheet in GameData.ts:
{ name: "bonus-coin", path: "assets/images/bonus-coin.png", width: 64, height: 64, frames: 8 }
IBonus.ts
L'implementazione dell'interfaccia è identica a quella del player:
interface IBonus {
    create(): void;
    update(time: number, delta: number): void;
}

export default IBonus;
Bonus.ts
Anche l'implementazione della classe Bonus è molto simile a quella del player:
import GamePlay from "../../scenes/GamePlay";
import IBonus from "./IBonus";

export default class Bonus extends Phaser.GameObjects.Sprite implements IBonus {
    protected _config: genericConfig;
    protected _scene: GamePlay;
    protected _body: Phaser.Physics.Arcade.Body;

    constructor(params: genericConfig) {
        super(params.scene, params.x, params.y, params.key);
        this._config = params;
        this._scene = <GamePlay>params.scene;
        this._config.scene.physics.world.enable(this);
        this._body = <Phaser.Physics.Arcade.Body>this.body;
        this._scene.addBonus(this);
        this._scene.add.existing(this);
        this._body.setImmovable(true);
        this.setDepth(100);
    }

    create() {}

    update(time: number, delta: number) {}

    // richiama un metodo della scena per rimuovere questo bonus
    getBonus() {
        this._scene.removeBonus(this);
    }
}
Questa implementazione ci servirà come base per creare diversi tipi di bonus che estenderanno la classe Bonus. Ad esempio creiamo un bonus di tipo BonusCoin.
Bonus-coin.ts
Come vedete, la classe BonusCoin estende la classe Bonus e quindi ne eredita i comportamenti di base. Immaginiamo che tutti i bonus abbiano un metodo comune .getBonus(). Con questo modello di implementazione possiamo sfruttare il metodo presente in Bonus senza doverlo implementare in ogni classe derivata.
Nel costruttore settiamo il nome del gameObject passandogli la stringa "coin". Ci sarà utile più avanti per differenziare i tipi di bonus quando vengono raccolti dal player.
import GamePlay from "../../scenes/GamePlay";
import Bonus from "./Bonus";

export default class BonusCoin extends Bonus {
    constructor(params: genericConfig) {
        super(params);
        // settiamo il nome di questo gameObject a coin
        this.setName("coin");
        this.create();
    }

    create() {
        if (!this._scene.anims.exists("bonus-coin-anim")) {
            let _animationConfig = {
                key: "bonus-coin-anim",
                frames: this._config.scene.anims.generateFrameNumbers(
                    this._config.key,
                    { frames: [0, 1, 2, 3, 4, 5, 6, 7] }
                ),
                frameRate: 10,
                yoyo: false,
                repeat: -1,
            };
            this._config.scene.anims.create(_animationConfig);
        }
        this.play("bonus-coin-anim");
        this.setScale(0.5);
    }
}
Integrazione completa nella scena GamePlay
Adesso dobbiamo aggiungere il nostro Bonus all'interno del GamePlay con tutti i metodi necessari per la gestione del gruppo e la collisione.
// [1] Importazione delle classi Bonus e BonusCoin
import Bonus from "../gameComponents/bonus/Bonus";
import BonusCoin from "../gameComponents/bonus/BonusCoin";
import Player from "../gameComponents/player/Player";

export default class GamePlay extends Phaser.Scene {
    private _mainCamera: Phaser.Cameras.Scene2D.Camera;
    private _player: Player;
    private _text: Phaser.GameObjects.Text;
    // [2] Dichiarazione della variabile _groupBonus
    private _groupBonus: Phaser.GameObjects.Group;

    constructor() {
        super({ key: "GamePlay" });
    }

    create() {
        this._mainCamera = this.cameras.main;
        this._mainCamera.setBackgroundColor(0xffffff);

        // [3] Creazione dell'istanza di gruppo in _groupBonus
        this._groupBonus = this.add.group({ runChildUpdate: true });

        this.add.image(0, 0, "bg6").setOrigin(0);
        this._text = this.add
            .text(0, 0, "")
            .setScrollFactor(0)
            .setFontSize(30)
            .setShadow(2, 2, "#000000", 2)
            .setStroke("#ff0000", 5);

        this._mainCamera.setBounds(0, 0, this.game.canvas.width * 2, this.game.canvas.height * 2);
        this.physics.world.setBounds(0, 0, this.game.canvas.width * 2, this.game.canvas.height * 2);

        this._player = new Player({ scene: this, x: 512, y: 300, key: "robo" });

        // [4] Richiamiamo addBonus() per aggiungere un bonus al gruppo
        this.addBonus(new BonusCoin({ scene: this, x: 100, y: 100, key: "bonus-coin" }));

        this.followPlayer();

        // [5] Creazione del collider tra il _player e il _groupBonus
        // quando collidono viene richiamato il metodo hitBonus
        this.physics.add.collider(
            this._player,
            this._groupBonus,
            this.hitBonus,
            undefined,
            this
        );
    }

    followPlayer() {
        this._mainCamera.startFollow(this._player, true, 0.1, 0.1);
    }

    unfollowPlayer() {
        this._mainCamera.stopFollow();
    }

    updateValues(x: number, y: number) {
        this._text.setText("player position: " + Math.round(x) + " " + Math.round(y));
    }

    // [6] Metodo richiamato quando c'è collisione tra player e bonus
    hitBonus(player: any, bonus: any) {
        const _bonus: Bonus = <Bonus>bonus;
        _bonus.getBonus();
    }

    // [7] Metodo per aggiungere un bonus al gruppo
    addBonus(bonus: Bonus) {
        this._groupBonus.add(bonus);
    }

    // [8] Metodo per rimuovere un bonus dal gruppo
    removeBonus(bonus: Bonus) {
        this._groupBonus.remove(bonus, true, true);
    }

    update(time: number, delta: number): void {
        this._player.update(time, delta);
    }
}
I punti chiave dell'implementazione:
- Importazione delle classi
BonuseBonusCoin - Dichiarazione della variabile
_groupBonus - Creazione dell'istanza di gruppo in
_groupBonus - Aggiunta del bonus al gruppo tramite
addBonus() - Creazione del collider tra
_playere_groupBonus - Metodo
.hitBonus()richiamato dal collider - Metodo
.addBonus()per aggiungere bonus al gruppo - Metodo
.removeBonus()per rimuovere bonus dal gruppo
Implementazione del Nemico
Un semplice platform
Un esempio concreto: Breakout
Introduzione
Custom class: player and ball
Custom class: brick
Custom class: bonus
Custom class: bonus weighted
Custom class: bonus bomb
Custom class: bonus score
Custom class: bonus laser
Vite e Game Over

Questo è il capitolo in cui il tuo progetto smette di essere "codice dentro le scene" e diventa un vero videogioco strutturato. Estendere Phaser.GameObjects.Sprite non è solo pulizia — è quello che ti permette di dare a ogni entità (player, nemico, proiettile) la sua logica, i suoi dati e il suo ciclo di vita, senza che la scena diventi un file di 2000 righe.
Il pattern interfaccia + classe (IPlayer + Player) sembra burocrazia in più quando il progetto è piccolo, ma è quello che ti salva quando aggiungi il terzo, quarto, quinto nemico: ogni classe custom rispetta lo stesso "contratto" (create(), update()), e puoi trattarle in modo intercambiabile nel resto del codice.
Ricordati che create() e update() qui non sono magici come nelle scene — nessuno li chiama per te di default. Sei tu a doverli invocare esplicitamente dalla scena che possiede l'istanza, a meno che il gameObject non viva dentro un Group con runChildUpdate: true: in quel caso è il gruppo stesso a chiamare update() su ogni membro ad ogni frame.
Tip pro: quando duplichi Player per creare Enemy, resisti alla tentazione di copiare-incollare tutto. Chiediti cosa hanno davvero in comune (vite? danno? animazioni?) e valuta se estrarlo in una classe base condivisa, prima che le due classi comincino a divergere in modo scomodo da mantenere. 🤖